
Setting Jaringan Warnet Berbasis Windows XP dan ADSL Modem (pada Speedy)
Kemampuan untuk melakukan Instalasi dan setting untuk sebuah Warung Internet (Warnet) selama ini dianggap hanya dimiliki oleh mereka yang sudah lama berkecimpung didunia IT Administrator. Dengan mematok biaya yang cukup lumayan mereka bersedia membantu kita dalam membangun sebuah Warnet yang hendaknya akan kita gunakan sebagai Unit Produksi. Ketidaktahuan tentang bagaimana sebuah sistem jaringan dapat berjalan lancar adalah alasan utama kita untuk terus menggunakan tenaga mereka. Berangkat dari keadaan tersebut maka saya menuliskan panduan ini. Sengaja dibuat dengan menampilkan langkah demi langkah agar dapat dimengerti dan dipahami bahkan oleh seorang yang sama sekali belum mengenal jaringan.—– more —–
Pada panduan ini akan dibahas instalasi dan setting untuk sebuah warnet yang memiliki 1 server & 12 client seperti terlihat pada gambar di bawah ini:

Persiapan Hardware & Software
Hendaknya sebelum kita melaksanakan instalasi jaringan, terlebih dahulu kita mempersiapkan Hardware & software yang akan tersambung di dalam lingkup jaringan tersebut. Beberapa langkah persiapan yang diperlukan adalah :
1. PC Server, spesifikasi minimal yang disarankan :
a. Hardware :
- MotherBoard : Kecepatan setara 3.00 Ghz untuk dual Core
- Ram : 1 Ghz
- Harddisk : 160 GB
- NIC / LAN Card : 10/100 Mbps
- Drive : DVD / CD Writer
- Spesifikasi lain : Optional
- Windows XP SP2
- Bandwith Controller / Manager
- Billing System, dll
- Anti Virus
- Firewall
- Anti Spyware, Malware, Adware
a. Hardware :
- MotherBoard : Kesepatan setara 2.80 Ghz
- Ram : 512 MB
- Harddisk : 40 Ghz
- VGA Card : Optional untuk Game
- Windows XP SP2
- Browsing Tools :
2. Mozilla FireFox (Free)
3. Opera
- Chatting Tools :
2. MSN Live Messenger
3. MiRC
4. ICQ
- Game Online, Example:
2. Ragnarok Online
3. Diablo II, dsb
- Adobe Reader (Free)
- WinZip
- WinRar
- Anti Virus (AVG Free Recommended)
- Winamp (Free)
- ACD See (Optional)
- Microsoft Office (Optional)
- Billing System, dsb
3. Hub / Switch / Router
Merupakan alat yang digunakan untuk membagi koneksi internet dari PC server ke PC
Client. Pilihan antara Hub / Switch / Router ditentukan oleh kemampuan koneksi yang
ingin dihasilkan, dan tentu saja di sesuaikan dengan dana yang tersedia. Pada studi
kasus kita kali ini saya akan menggunakan Switch sebagai pembagi koneksi internet.
4. Modem
Modem adalah sebuah device yang digunakan sebagai penghubung dari sebuah PC atau
jaringan ke Penyedia Layanan Internet (Internet Service Provider / ISP). Penggunaan
Modem yang akan di bahas kali ini adalah modem jenis ADSL. Modem jenis ini
biasanya digunakan oleh ISP Telkomspeedy. Untuk jenis modem ADSL itu sendiri bisa
dipilih berdasarkan kebutuhan. Kali ini penulis mengambil contoh ADSL LynkSys AM
300 yang hanya mempunyai 1 (satu) port saja sebagai Dialup Device.
Setting Modem ADSL Eksternal
Berikut adalah langkah yang harus dilakukan untuk memastikan PC Server terhubung ke
internet :
1) Buka Internet Explorer anda dan ketikan alamat berikut : 192.168.1.1 (biasanya adalah
alamat IP default bagi Modem).
2) Setelah muncul jendela login isikan username: admin Password: admin, atau sesuai
dengan user guide yang terdapat pada saat pembelian Modem.
3) Isikan sesuai dengan yang tertera pada gambar berikut, kecuali user name dan password yang masing-masing berbeda sesuai dengan yang didapat dari ISP.
4) Pengisian selanjutnya adalah untuk mengijinkan DHCP Server enable/disable,
sebaiknya dipilih Option Enable agar kita tidak direpotkan dengan urusan menyetel satu
demi satu IP Client. Karena fasilitas ini mempunyai kemampuan untuk mensetting IP
Client secara otomatis.
5) Untuk pengisian Time Zone dilakukan sesuai dengan domisili anda tinggal. Dan untuk
time server settingan yang tertera pada gambar adalah settingan yang saya
rekomendasikan.
6) Jika kita ingin mengganti modem username & password kita dipersilahkan untuk
melalukannya pada option berikut :
7) Status Koneksi kita bisa kita pantau pada tabs status (gambar), sebetulnya alamat IP
kita tertera pada bagian bawah layar. Tidak saya tampilkan dengan alasan keamanan.
dengan membuka Internet Explorer kita, lalu masuk ke salah satu alamat WEB yang
mudah diloading. Contoh : Http://www.google.co.id/ lalu untuk pengetesan kecepatan
bisa dilakukan melalui beberapa situs yang menyediakan layanan pengukuran
Bandwith, contoh: http://www.sijiwae.net/speedtest/ .
Sinkronisasi
Setelah hubungan antara PC server dan koneksi internet dapat berjalan lancar langkah
selanjutnya adalah sinkronisasi. Agar semua komputer dapat tersinkronisasi secara benar, berikut adalah langkah-langkah yang harus dilakukan :
1) Sinkronisasi Nama Komputer / PC dan Nama Work Group dilakukan dengan cara
sebagai berikut :
a. Menampilkan Task Control System
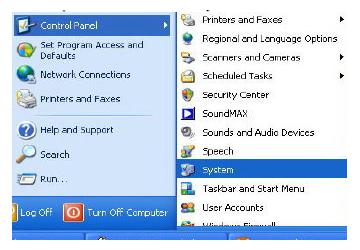
b. Pada Tab Computer Name klik Change untuk mengubah nama komputer dan
nama WorkGroup. Nama komputer sebaiknya diurutkan sesuai dengan nomor
Clientnya untuk memudahkan kita mengingat masing-masing nama komputer,
nama masing-masing PC tidak boleh sama. Namun untuk nama Workgroup
harus lah dibuat sama untuk semua Client dan juga Server.
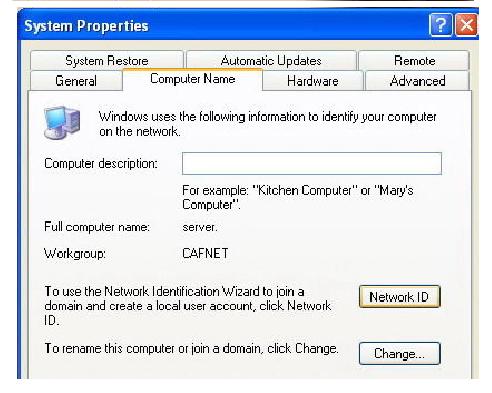
c. Setelah nama PC kita ganti langkah selanjutnya adalah mengganti Network ID
dengan cara mengeklik Tab Network ID pada task Control System tadi.
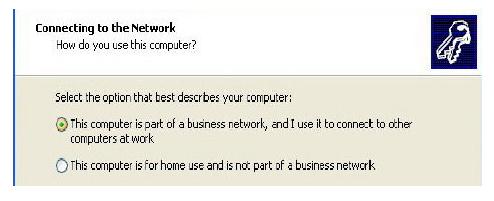
i. Pada pertanyaan How Do You Use This Computer pilihlah option This Computer is part of a business network, kemudian Klik Next.
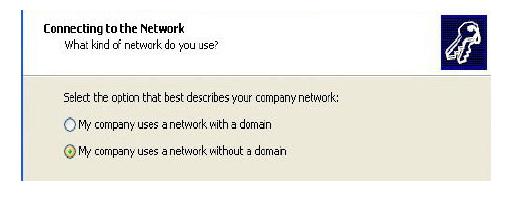
ii. Pada Option selanjutnya pilihlah Network without a Domain.
iii. Selanjutnya isikan nama WorkGroup sesuai dengan nama WorkGorup yang kita isikan pada waktu mengganti nama PC pada langkah (b) tadi.
iv. Selanjutnya Klik Next dan kemudian Finish. Tunggu beberapa saat hingga komputer selesai melakukan pergantian Network ID dan lakukan restrat System Operasi / Reboot.
2) Sinkronisasi Waktu / Jam dilakukan dengan menempuh langkah sebagai berikut:
a. Double klik tampilan jam yang ada pada sudut kiri bawah desktop anda.
b. Pilihlah tabs Internet Time => Update Now
c. Tunggu beberapa saat hingga terdapat statement berikut : The time has ben
succesfully Synchronized.
d. Jika yang tampil adalah statement error, maka ulangi klik Update Now hingga
berhasil menyamakan waktu PC anda dengan server Windows.
e. Jika Update berhasil, namun jam yang ditampilkan tidak sama, maka kesalahan
mungkin terjadi pada Time Zone untuk wilayah WIB wilayah waktunya adalah
GMT + 07.00 Bangkok, Hanoi, Jakarta sedangkan untuk WITA adalah
GMT+08.00 Perth dan WIT dengan GMT + 09.00 Seoul.
Internet Connection Sharing (ICS)
Sampai dengan tahap ini PC yang terkoneksi keinternet hanyalan PC server saja. Untuk
memberikan akses bagi PC client agar mempunyai akses ke internet kita perlu mengaktifkan Internet Connection Sharing yang kita miliki pada PC server. Langkah-langkahnya adalah sebagai berikut :
1) Buka Jendela Network Connection yang terdapat pada Control Panel. Lalu klik kanan
pada Koneksi aktif kita ke internet => pilih Properties.
2) Pada tabs Advanced aktifkan option Allow other network users to connect through this
computer’s Internet Connection.
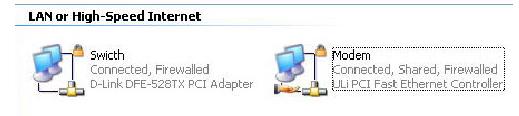
3) Setelah Koneksi Internet berhasil di sharing maka akan muncul 2 buah macam koneksi. Sebaiknya ganti nama masing-masing koneksi tersebut agar mudah membedakan antarakoneksi yang terhubung ke Modem dengan Koneksi yang terhubung ke Switch dengan cara me-rename masing-masing koneksi tersebut.
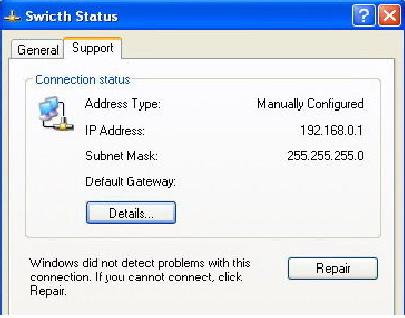
4) Jika kita buka properties pada koneksi yang terhubung ke Switch, pada tabs support
terdapat alamat IP yang akan menjadi default Gateway bagi PC Client yang akan
terhubung melalui PC Server (192.168.0.1).
Network Setup
Langkah-langkah yang kita lakukan tadi hanyalah untuk memberikan izin bagi PC Client agar dapat mengakses Internet. Untuk mengaktifkan Izin tersebut dilakukan dengan cara mensetup Network / Jaringan yang kita miliki. Langkah pengerjaannya adalah sebagai berikut :
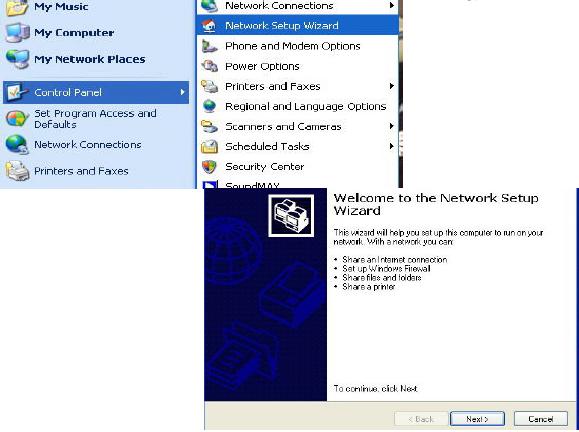
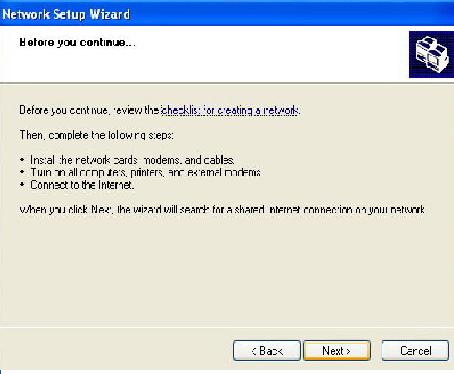
1) Buka Network Setup Wizard yang terdapat pada Control Panel. Lalu lakukan langkah
seperti pada gambar. (pastikan Koneksi ke internet dalam keadaan hidup).
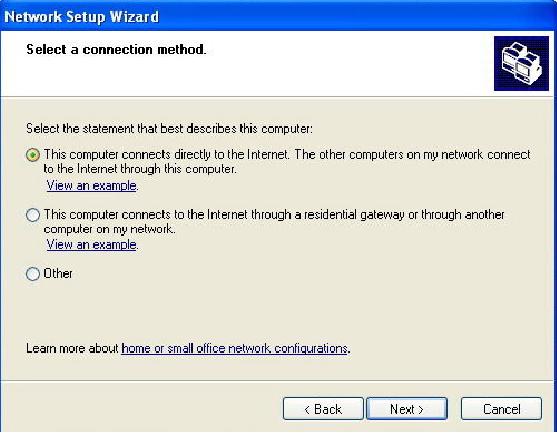
2) Pada pilihan select a Connection Method pilih yang Connect Directly to the Internet
untuk PC server dan bila melakukan settingan pada PC Client plihlah Option Connect to
the internet through a residental gateway.
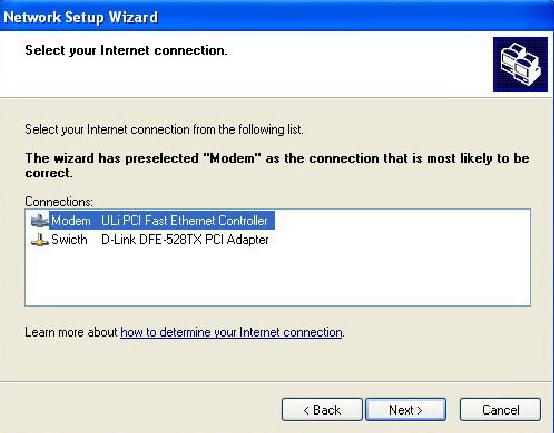
3) Option Berikut meminta kita menentukan koneksi yang mana yang akan kita gunakan
untuk melakukan dial-up ke Internet. Pilihlah koneksi yang tersambung ke Modem.
Pilihan ini tidak ada pada saat kita melakukan setting di PC Client.
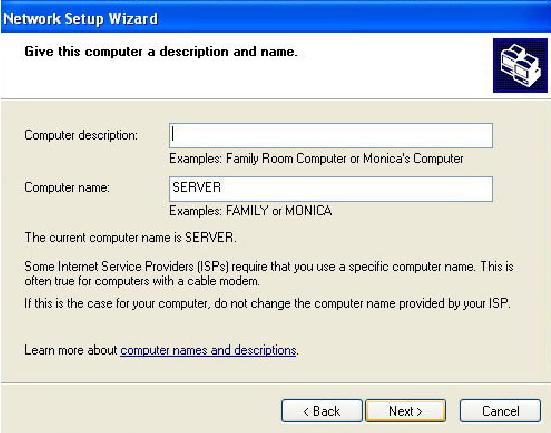
4) Isikan Computer Name sesuai dengan nama yang telah kita berikan tadi, lalu isikan
Computer Description jika anda inginkan (Optional / tidak diisi tidak berpengaruh).
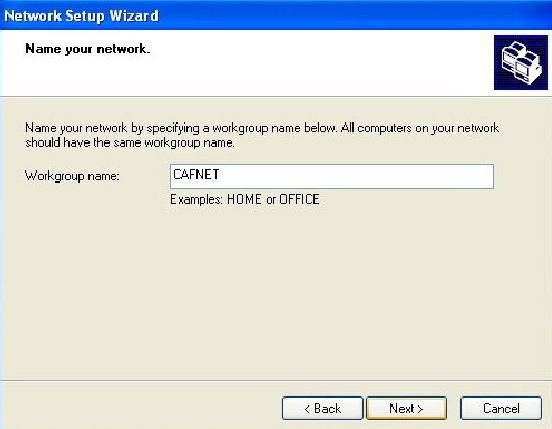
5) Isi Nama Workgroup sesuai dengan nama yang telah kita tentukan sebelumnya. Perlu
saya ingatkan kembali bahwa nama workgroup sebaiknya sama untuk semua komputer
agar langkah setting lebih mudah.
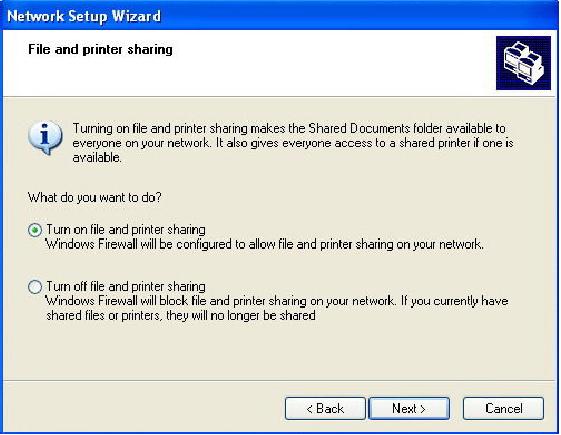
6) Pilihlah option Turn On File and Printing Sharing pada task selanjutnya.
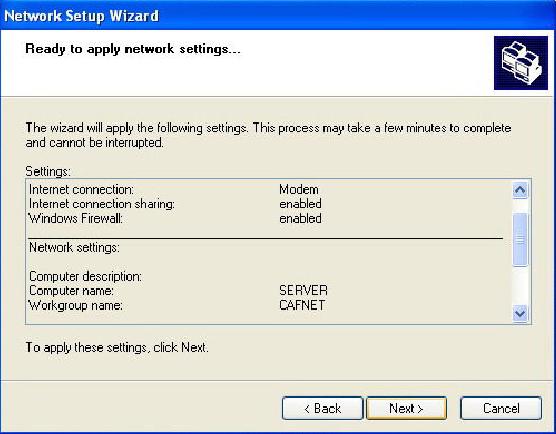
7) Setelah settingan pada jendela log kita anggap benar klik next untuk menjalankan /
Mengaktifkan settingan yang telah kita buat tadi.
barunya.
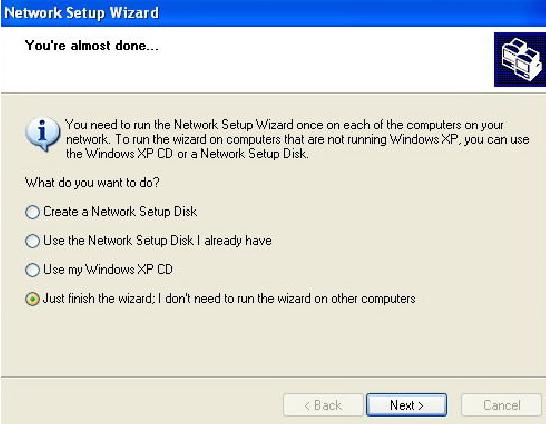
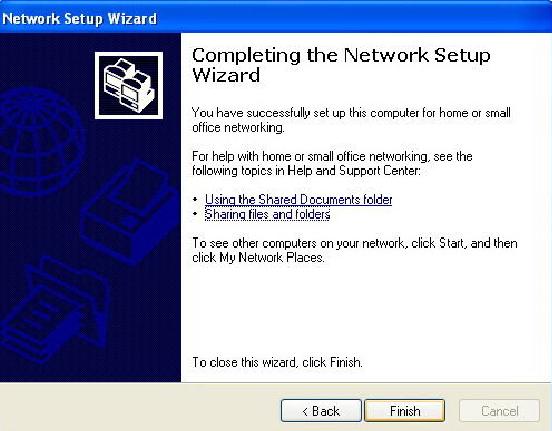
9) Pilih option just finish wizard, lalu klik Next = > Finish. Biasanya PC akan otomatis
reboot setelah menyelesaikan prosedur tadi.
Langkah yang sama kita lakukan pada semua PC Client. Perbedaan cara setting antara PC
Server dan PC Client hanyalah terletak pada point 2 dan point 3.
Setelah menyelesaikan langkah settingan tersebut pada PC Client lakukanlah pengetesan
koneksi dengan cara yang sama dengan PC Server, yaitu mengunjungi alamat situs yang mudah di Loading dan mengetes kecepatan koneksi. Bila koneksi yang ada dirasa terlalu lambat silahkan lakukan pengecekan pada settingan Network tadi apakah ada Option yang salah atau tidak, dan juga lakukan pengecekan pada koneksi perkabelan apakah suda terposisikan dengan baik atau belum.
Sampai dengan langkah ini semua PC Client bisa terhubung dengan bebas ke Internet selama PC Server menghidupkan Koneksinya. Untuk membatasi penggunaan pada PC Client adal beberapa pilihan. Yang pertama adalah membuat list user dari Computer Client, user mana yang mempunyai hak untuk mengakses internet yang mana yang tidak diizinkan untuk mengaksesnya. Settingan tersebut biasanya digunakan di perkantoran. Sedangkan untuk warnet, pembatasan akses biasanya dilakukan dengan menginstalkan program billing pada C Server dan PC Client. Untuk produk billing dalam negeri sudah terdapat beberapa pengembang program diantaranya adalah www.billingexplorer.com dan www.indobilling.com untuk keperluan setting billing ini silahkan menghubungi pengembangnya masing-masing.
Reff:
- Microsoft Windows XP SP2 Help Menu
- Fahrial, Jaka, Teknik Konfigurasi LAN, www.ilmukomputer.com
- Kelik, Wahyu, Pengantar Perkabelan & Jaringan, www.ilmukomputer.com
- www.google.com
- www.sijiwae.net/speedtest
- Permana, Wahyu, Bimbingan Lewat Chatting
- Sudiyana, Wayan, Bimbingan Lewat Chatting
- Solehudin, Asep, Bimbingan Lewat Chatting
- Yudhi Arie Baskoro
Setting Windows XP-Based Network Warnet and ADSL modem (at Speedy)
Ability to perform installation and settings for a Public Internet (Warnet) have been considered only owned by those who have long been the world's IT administrator. With a peg the cost of a pretty good they are willing to assist us in building a Warnet which should we use as a production unit. Ignorance of how a network system can run smoothly is the main reason we are to continue to use their power. Departing from the situation then I wrote this guide. Deliberately created by showing step by step in order to understand and be understood even by someone who did not yet know the network.
- More -
In this guide will discuss the installation and settings for a cafe that has 1 server & 12 clients as shown in the figure below:
fig-1.jpg
Preparation of Hardware & Software
Should be before we carry out the installation of the network, we first prepare the hardware & software that will be connected within the scope of the network. Some preparatory steps required are:
1. PC Server, the recommended minimum specifications:
a. Hardware:
Motherboard: The speed is equivalent to 3:00 Ghz Dual Core
Ram: 1 Ghz
Hard Drive: 160 GB
NIC / LAN Card: 10/100 Mbps
Drive: DVD / CD Writer
Other Specifications: Optional
b. Software:
Windows XP SP2
Bandwidth Controller / Manager
Billing System, etc.
Anti-Virus
Firewall
Anti Spyware, Malware, Adware
2. PC Client
a. Hardware:
Motherboard: Agreement equivalent to 2.80 GHz
Ram: 512 MB
Hard Drive: 40 GHz
VGA Card: Optional for the Game
b. Software:
Windows XP SP2
Browsing Tools:
1. Internet Explorer
2. Mozilla FireFox (Free)
3. Opera
Chatting Tools:
1. Yahoo Messenger (Free)
2. MSN Live Messenger
3. MIRC
4. ICQ
Online games, Example:
1. Warcraft III
2. Ragnarok Online
3. Diablo II, etc.
Adobe Reader (Free)
WinZip
WinRar
Anti-virus (AVG Free Recommended)
Winamp (Free)
ACD See (Optional)
Microsoft Office (Optional)
Billing System, etc.
Operating System Window $ is very expensive, for that we can mensiasatinya by buying second CPU Built-up from abroad is still good. Usually in addition to higher quality than on the CPU assembly, CPU Built-up from abroad has also been equipped with the Windows Operating System Standard.
3. Hub / Switch / Router
Is a tool used to share Internet connection from the server PC to PC
The client. The choice between Hub / Switch / Router connection is determined by the ability of
to generate, and of course adjusted to the available funds. In studies
our case this time I will use the Switch as a shared Internet connection.
4. Modem
Modem is a device that is used as a link from a PC or
network to the Internet Service Provider (Internet Service Provider / ISP). Use
Modems that will be discussed this time is the type of ADSL modem. Modem type is
commonly used by ISPs Telkomspeedy. For this type of ADSL modem itself could
selected based on need. This time the author takes the example of ADSL LynkSys AM
300 which only has 1 (one) just as Dialup Device port.
External ADSL Modem
Here are the steps to be taken to ensure the PC server is connected to the
Internet:
1) Open your Internet Explorer and typing the following address: 192.168.1.1 (which is usually
The default IP address for the modem).
2) After the login window pops up fill in the username: admin Password: admin, or in accordance
with the user guide is contained at the time of purchase of Modem.
3) Fill in as stated in the following figures, unless the user name and password each different in accordance with that obtained from the ISP.
4) Charging the next is to allow DHCP Server enable / disable,
Enable Option should be selected so that we are not bothered with the affairs set up one
by one IP Client. Because this facility has the capability for setting up IP
Client automatically.
5) For the filling Time Zone do you live in accordance with the domicile. And to
time server settings shown in the figure are the settings I
recommend.
6) If we want to replace the modem username & password you are welcome to
melalukannya the following options:
7) Status Connection we can we monitor the status tabs (picture), is actually an IP address
we listed at the bottom of the screen. I did not show for security reasons.
8) After all the testing steps tersetting good we can do is
by opening Internet Explorer we are, then go to one of the WEB address
diloading easy. Example: Http: / / www.google.co.id/ ago for testing speed
can be done through several sites that provide measurement services
Bandwidth, for example: http://www.sijiwae.net/speedtest/.
Synchronization
Once the connection between the PC server and internet connection can run smoothly step
next synchronization. So that all computers can be synchronized correctly, here are the steps that must be done:
1) Synchronize the Computer Name / PC and the Work Group conducted by
as follows:
a. Displays the Task Control System
fig-5.jpg
b. In the Computer Name tab click Change to change the computer name and
workgroup name. The computer name should be sorted according to the number
Clientnya to help us remember each computer name,
name of each PC should not be the same. But for the name of the Workgroup
must be made is the same for all Client and Server.
fig-6.jpg
c. Once we change the name of the PC the next step is to change the Network ID
by clicking on a task Tab Network ID Control System earlier.
i. On the question How Do You Use This Computer option select This Computer is part of a business network, and then click Next.
fig-7.jpg
ii. In the next option choose Network without a Domain.
fig-8.jpg
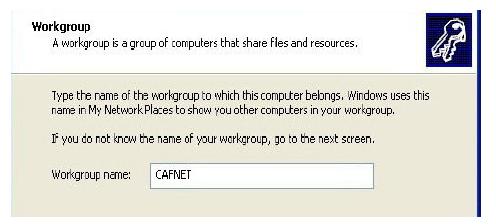
iii. Next fill in the workgroup name matches the name WorkGorup that we fill in the time to change the name of the PC in step (b) earlier.
fig-91.jpg
iv. Next Click Next and then Finish. Wait a few moments until the computer has finished the turn of the Network ID and do restrat Operating System / Reboot.
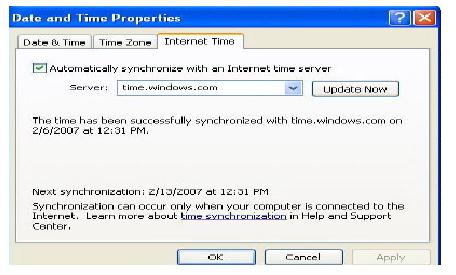
2) Synchronization Time / Clock done by taking the following steps:
a. Double click the clock that is on the bottom left corner of your desktop.
b. Choose tabs Internet Time => Update Now
fig-10.jpg
c. Wait a while until there is the following statement: The time has ben
Synchronized succesfully.
d. If the show is a statement of errors, then click Update Now to repeat
managed to time your PC with the Windows server.
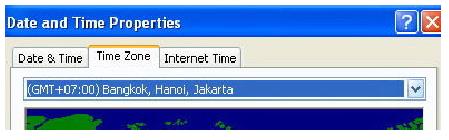
e. If the update is successful, but the clock display is not the same, then the error
may occur in the Time Zone to GMT time region is
GMT + 07:00 Bangkok, Hanoi, Jakarta while for AM is
Perth and CDT GMT +08:00 to GMT + 09:00 Seoul.
fig-11.jpg
Internet Connection Sharing (ICS)
Up to this stage connected PC keinternet hanyalan PC server only. To
provide access to the PC client to have access to the internet we need to enable Internet Connection Sharing what we have on the PC server. The steps are as follows:
1) Open the Network Connections window contained in the Control Panel. Then right-click
on our active connection to the internet => select Properties.
fig-12.jpg
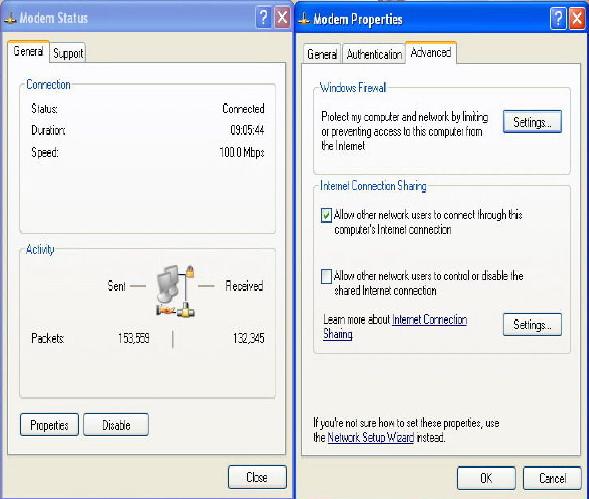
2) On the Advanced tabs enable the option Allow other network users to connect through this
computer's Internet Connection.
3) Having succeeded in sharing the Internet connection it will display two kinds of connection pieces. Should change the name of each connection so you can easily distinguish antarakoneksi connected to the modem with a connection that is connected to the Switch in a way to rename each of these connections.
fig-13.jpg
4) If we open the connection properties that are connected to the Switch, the support tabs
there are IP addresses that will be the default gateway for PC Client to be
Servers are connected via a PC (192.168.0.1).
fig-14.jpg
Network Setup
The steps that we just did was to give permission for the PC Client in order to access the Internet. To activate the license is done by setting up Network / Network that we have. The process steps are as follows:
1) Open the Network Setup Wizard found in Control Panel. Then do the
as shown. (Make sure the connection to the internet in a state of life).
fig-15.jpg
fig-16.jpg
2) In the options select a Connection Method select the Connect Directly to the Internet
for PC servers and when do the setting on your PC Connect to Client Option plihlah
the Internet through a residental gateway.
fig-17.jpg
3) Option Here we determine the connection request which we will use
to dial-up connection to the Internet. Choose the connection that is connected to the modem.
This option is not there when we do the settings in the PC Client.
fig-18.jpg
4) Fill in the Computer Name as the name we have given earlier, and then fill
Computer Description if you want (Optional / not filled no effect).
fig-19.jpg
5) Fill in the Workgroup name matches the name that we specify. Need
I remind you again that the workgroup name should be the same for all computers
order setting step easier.
fig-20.jpg
6) Select the option Turn On File and Printing Sharing on the next task.
fig-21.jpg
7) After setting the log window we think is right click next to run /
Activate the setting that we have made earlier.
fig-22.jpg
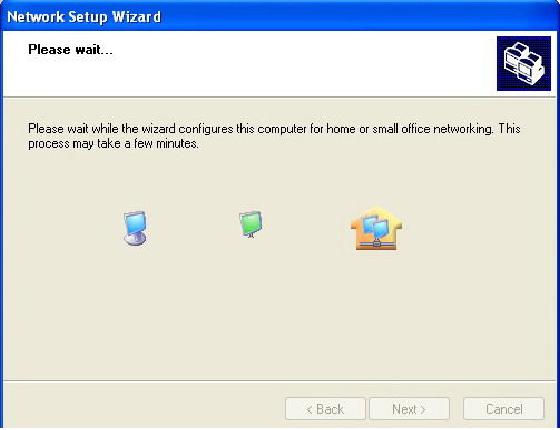
8) Wait a few moments until the computer has finished adjusting the setting
new.
fig-23.jpg
9) Select the option just finish the wizard, then click Next => Finish. Usually the PC will automatically
reboot after completing the procedure.
fig-24.jpg
fig-25.jpg
The same steps we did in all of the PC Client. The differences in settings between the PC
Server and PC Client is located at point 2 and point 3.
After completing this setting step do the testing on the PC Client
connections in the same way with the PC Server, which is visiting the site address that is easy on the loading and test the connection speed. If an existing connection is too slow please do check the Network settings option earlier if there is wrong or not, and also do check the wiring connections are suda latches on properly or not.
Until this step all Client PCs can be connected freely to the Internet for turn connects PC Servers. To restrict the use of the PC Client adal several options. The first is to create a user list from the Computer Client, which users have the right to access the internet which are not allowed to access it. Setting is usually used in offices. As for the cafe, access restrictions are usually done by installing billing program in C Server and PC Client. For billing products in the country there are already several programs including the developers and www.indobilling.com www.billingexplorer.com billing settings for this please contact the respective developers.
Reff:
Microsoft Windows XP SP2 Help Menu
Fahrial, Jake, LAN Configuration Engineering, www.ilmukomputer.com
Kelik, Revelation, Introduction to Cabling & Networks, www.ilmukomputer.com
www.google.com
www.sijiwae.net / speedtest
Permana, Revelation, Guidance Through Chatting
Sudiyana, Wayan, Guidance Through Chatting
Solehudin, Asep, Guidance Through Chatting
Arie Yudhi Baskoro


0 comments:
Post a Comment
silahkan komentar kepada kami saran dan kritikan kami trima untuk di evaluasi